Archives

Glitter Queens Blog Hop Day One of Three

bloghop


large lolly

I am SO excited! This is my first blog hop to participate in. My team members, “The Glitter Queens,” invited me. This will be a 3 day blog hop so be sure to stop by tomorrow and Wednesday to see what special items we’ve chosen for you.

hanging

I love, love, love, to make Lollies or Rosettes. This past Christmas I made a lot of them. I added ribbon and hung them on gifts (see photo above), I did a class for them, and I handed them out and decorated my tree with them. Everyone loved them!

gift trio

Unfortunately, I only have a few left and I didn’t take pictures of the ones I gave away.

square

They don’t all have to be round!  (As I placed this on the red background to take a picture today, I thought, “What a pretty card this would make.”)

first postit

Also this past Christmas I made a bunch of Post-It note holders out of chip board and coasters. I made so many in fact, that I still have quite a stash of them. The one above is my very first one. I cut the chip board and sanded and inked the edges. It is quite a lot of work unless you are only going to do one or two. I made quite a few this way until my coasters arrived!

teal rosezette  tealpostit inside

The coaster Post-It note holders were easier since they were already cut. This shows the inside. The 3×3″ Post-It notes work great.

teal no lolly  bow

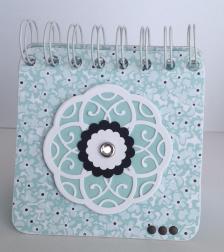
The two above aren’t decorated with Lollies but are just as pretty.

eggplantpostit  green

It is so much fun trying different patterns of paper. Also, decorating the tops with different embelishments.

3 lollies


lollies

This is a good way to use up some of that retired DSP you have. I used the Stampin’ Up! Rosette bigz XL die to make my Lollies but you can also get the same affect with the score board. Just score every 1/4″. I used 2 strips about 11 1/2″ long and 2″ wide to make 1 Lolly for my Post-It note covers.

So are you ready to see what the next person on the blog hop has in store for you? Just click the “Next” button below. There is also a list of participants and you can go directly to their blog by clicking on their name.  Thanks for stopping by! Please come back tomorrow. I have more fun stuff planned for you!

Dawn Griffith

Jennifer Kay

Dee Slater

Sue Novick

Tracy Bradley

Kris Miller

bloghop      next    previous


Storage Tip #3 (Part 2) Dies

BIGZ DIES

image

I had no good way of storing my Bigz dies. So, they all ended up in a file drawer. And of course the one I wanted was always on the bottom. I ordered this box from Stampin’ Up!. It’s a storage box made just for the Bigz XL dies. Inside the box are 2 inserts. The inserts are not glued down but come with adhesive strips.

image

I decided that I didn’t want to store my dies inside the box. I wanted to be able to see them. So, instead of placing the inserts inside the box, I placed the inserts on top of an Iris cart that sits right next to my Big Shot. (I didn’t use the adhesive strips.) I LOVE IT! Not only are my dies easy to get to but I am also able to keep my Magnetic Platform there also. When I’m using my Magnetic Platform I can keep my Multi-Purpose platform in that spot. I like this even better than the storage of the dies.

image

I had to place some of the dies so that the labels didn’t show. So, I relabeled them. And I put a pink square to the right on the retired dies.

image

image

All of my dies are visible and within arms reach of my Big Shot.

Be sure to check back soon to see my storage solution for Stampin’ Dimensionals, Sticky Strip & Basic Pearls & Rhinestones.

Easter Baskets

large loly
I have 4 grandchildren and when I saw Elaine Jackson’s video on how to make these origami baskets, I knew I had to do them for my grandchildren.

4 undecoratged
Here are the baskets before decorating. I think they look beautiful just as they are but, I couldn’t help adding a little bling to them. I knew that I wanted some type of handle for lifting off the lids and this worked out great.

all 4
They are actually quite easy to make but with all the embellishing and fussing I did to them, it took me about 5 hours time. Of course I had a ball doing them so the time didn’t really matter. And I was so excited to see the grandkids’ faces when they saw them. The 3 girls are teenagers (actually one just turned 20) and loved them! They want to use them as jewelry boxes. My grandson is 10 and although he liked it, the candy was more important to him. (:  His is the green one so I left off the flowers on the front and didn’t pretty it up quite as much as the girls.
lg purplelg pinklg blue
The blue basket was the only one that didn’t have Stampin’ Up! Ribbon for handles and it was the only one that wouldn’t stay up. This shows the great quality of Stampin’ Up! ribbon. The Rosettes on top were made with the Stampin’ Up! Designer Rosette Bigz XL die. This die is a little pricey but but well worth the money. I use it for all occasions.
wrapped

Here they are wrapped and ready to be delivered (which I did yesterday). The baskets are full of candy too. Can you believe I forgot to take pictures of the kids when they opened them!!!? Oh well, what a fun project! If you want to give it a try visit Elaine’s website. Thanks for stopping by. If you have any questions, let me know.

Embossing Folder/Card Box Part 2

lg lolly

This is a follow up to yesterday’s post. ………….

red

Rosettes are another thing I enjoy making. With this one I used the Scallop Trim Boarder punch for the edging. The heart was punched from the silver glimmer paper.

wisteria

Wisteria Wonder cardstock and DSP paper stacks adorn this box. The bow was made with the Bigz Bow Die from the Holiday catalog (and is still available). A quick easy way to embellish a project.

pinkwatercolor

I used the Watercolor Wonder DSP on this box. And it is the same DSP that I used with the Tangerine Tango box on yesterdays post. Even though it isn’t meant to go with the Pink Pirouette I noticed that when paired with it, the match is fantastic!

group

I hope you have enjoyed seeing these as much as I enjoyed making them. Again, this box was designed by Sam, not me. She actually intended it to be used as a card holder box, but as crafters do, someone found another use for them. And I was so thrilled to find something so pretty to store my embossing folders in! For directions on how to make them, you can go here:

wrapped

These were too pretty to keep all to myself. I packaged 2 of them up for friends for Valentine’s Day. I chose the ones that I knew were colors that they liked. I added an embossing folder and a small gift. I liked the results so much that I was thinking of doing some card kits for selling at our next craft sale.

Rosette Valentine

lg front

I love making these Rosettes or Lollies as some call them. I have the Stampin’ Up! die that cuts them for me, but I did this one with my Simply Scored. Since not all of my stamp club ladies have the die I wanted them to be able to make them at home. I put a 12 X 12″ piece of DSP in my Simply Scored and scored at 1/2″ increments all the way across. Then I cut the DSP at 1 1/2″ strips. It took no time at all! I used 2 pieces end to end for each Rosette. The Simply Scored is a WONDERFUL tool!

front

Isn’t this glimmer paper beautiful?! I thought this would be a good card for a man. It has that masculine look to it.

side

This Rosette was made using the Modern Medley DSP. I think this is my favorite DSP in the Annual Catalog. However, there are a couple of the designs that I am not fond of and would go unused. This was the perfect way to use up these sheets.

inside

I finished off the inside of the card with another heart punch with the glimmer paper. Thanks for stopping by!

Christmas Wreath

lolly

This was a fun project! It only took a couple of hours and I was very please with the results. I used the Season of Style DSP in the Holiday catalog for the wreath and the Designer Rosette Bigz XL die in the annual catalog for the rosette. I also used the Frosted Finishes Embellishment (these are my very favorite!).

wreath

There is a big sale on the clearance rack today! They have some DSP that would make beautiful wreaths. I ordered some and may try my hand at another one if I have time before Christmas. You can view the clearance rack sale here. http://www.stampinup.com/ECWeb/default.aspx

wall

This is my dining room wall. I’m sorry, I have not been posting much lately but I have been very busy with classes. I should be back to posting regularly now.
Thanks for stopping by.